Wednesday 28 November 2012

Timeless Twenties... by Joanna King

I can't believe it's already time for my final post as the November's Guest Designer at The Artistic Stamper... Where has November gone???

Before I share my final project, I would like to say a big 'thank you' to Jennie and the Creative Team for inviting me to share this fabulous Artistic Stamper adventure. Another big 'thank you' to Emma, for all her help and hard work to make this adventure so much fun! And I mustn't forget about You lovely crafters - for leaving such wonderful comments on my previous projects :).


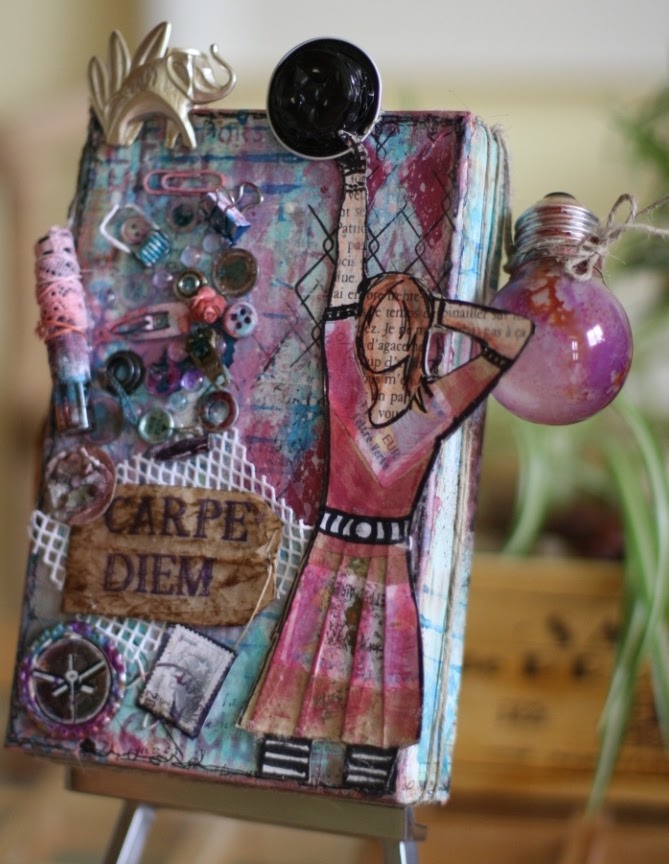
Today I have an altered shadow box/frame to share. The stamps I used are from Twenties #1 A5 plate, Lacy Border and the sentiment is from the Time and Keys set.

I started my project by painting the frame with a few coats of matt emulsion paint. Then, using the Coffee Archival ink, I stamped the Lacy Border on each side. If you stamp the pattern by hand without a stamping block, you can control the amount of pressure you apply. This way you can easily create a worn, distressed look by leaving parts of the image unstamped :).


The front and the inner part of the frame were decorated with printed napkins. Napkin art is my fave technique at the moment :).

Then I stamped the lovely Twenties Ladies and the sentiment onto patterned papers and coloured them subtly with chalk pencils. The peacock feather was highlighted with metallic markers.


Before I sealed the background image within the box, I added some highlights with Stampendous glitter and colour fragments around the glass and the inner frame. And I also added some crushed glass glitter to turn my shadow box into a shaker box :).


To decorate the front I used a couple of peacock feathers and a moulded flower I made from embossing enamels and UTEE.

I hope you like this last project from me and I have really enjoyed sharing inspiration here with you. I hope you will still pop over to my Creative Spell to say 'hello' from time to time :).

Big hugs

Monday 26 November 2012

Let it Snow...


Hello everyone, Astrid here with my second project for November.

I seem to have fallen in love with the colours blue and brown, not exactly traditional for Christmas projects, but for some reason I can't seem to get away from them.....
For my second project this month  I decided to make a piece of Christmas wall art.
I used the following stamps for my project:
Mini Christmas 1
Christmas Greetings 1 and
Music# 011
I started by taking a piece of 5.5 by 4" smooth white card and coloured it by putting some Distress Stains in Tarnished Brass, Bundles Sage and Picket Fence on my craft sheet and swiping my card stock through it several times. I then coloured it further  with some  Distress Inks in Chipped Sapphire, Vintage Photo and Scattered Straw. I  crumpled it all up, roughly flattened it again and then dried it with my heatgun. I then ran it through an embossing folder from my stash and darkened the embossed bits some more.
The next step was to colour a small canvas board with Pains Grey acrylic paint, it's called grey but is actually blue. I'm pretty sure you would get a very similar effect with Sapphire Blue Distress Stains, but I don't have that one. Before it had dried I dabbed it with a piece of kitchen towel to get a textured effect and when it was dry I  stamped some of the little snowflakes from the Christmas Greetings 1 plate in white by using the Picket Fence Distress Marker. Love how they slowly start to appear against the dark background. I embellished the background with a strip of canvas tape, stamped with the music stamp and some lace.
The final steps were to stamp some of the Christmas stamps from the two plates I used on smooth card, cutting them out and colouring them with the same colours of Distress Inks. Next I cut theTim Holtz Decorative Snowflake Rosette Die, slightly inked and glittered with some Diamond Stickles. I ran the topper through a little snowflake embossing folder in my stash to give it some more texture and then I put it all together as you can see on the photo.
Thank you for dropping by, - I hope you liked my project and feel inspired to use some of the wonderful Artistic Stamper Christmas stamps for your own Christmas projects.

Saturday 24 November 2012

The Creative Team Stars!

Hi, it's the Chief Rubber Stamper here checking in a little early this month. I thought I would use this opportunity to publicly thank my wonderfully creative team for all their hard work this past year. I know from all the comments that you enjoy their very innovative creations and posts using The Artistic Stamper stamps. I love what they do, and a very BIG thank you, comes from me to Emma, Alison, Sioux, Astrid, Louise and Tit for all their hard work making sure that everything is in place for you to ogle over!

I have been making lots of Christmassy tags, just to get in the mood for next month, and this tag is very appropriate for my wonderfully supportive team .
 Thank you girls, it is very much appreciated.
 I used Tim's new Star die, ( this is one of my favourites :)), inked with distress inks with one of his stamps.


Have a very creative weekend
Hugs
Jennie

Thursday 22 November 2012

Altered book by Titbelsoeur

Ca va tout le monde ?
This year, I participated in a Circle Journal swap with French friends. My topic was the Universal Exhibition of 1900 in Paris. To store the pages I have received, I altered an old book.
The first half of the book is made with the various pages, and the second half hosts a niche I glued some things into, such as buttons, cogs and so on...

A page :

the covers :

the niche filled with little treasures :


The Gibson Girls I love so much are stamped here and there, clearly or shadowy. No acrylic paint in this book, only Distress inks such as Tumbled Glass, Vintage Photo and Walnut Stain.

Would you be interested in viewing the awesome pages I received from my friends, just pop up to my blog @ http://titbelsoeur.blogspot.fr/

I hope you like my altered book
thanks for stopping by, 
I am looking forward to reading your comments ! 
A très bientôt !!

Tuesday 20 November 2012

A Burlesque 18th by Alison

Hello Stampers!
Today's project from me, is the card that I made for my daughter Beth, for her 18th birthday, which was on the 18th of this month. I chose the theme of 'Burlesque', because that was the outfit that she wore to her fancy dress party. I wanted her card to act as a reminder of this. The Artistic Stamper has some beautiful Lace stamps, which were perfect!
So here is my card, in all its bright & feathery glory...
The base is an A4 piece of black card, folded in half.
On a piece of white card, I stamped the Lace Background twice, next to each other, in black Versafine ink then embossed it using clear embossing powder. I then stamped the Lacy Border 4 times in black, & clear embossed them as before. I cut around the background & borders, then inked them all with Picked Raspberry Distress Ink.
I attached the background to the black card base, then added the lacy borders, as shown.
I stamped 'Follow Your Dreams' from Journaling Words 1, onto shrink plastic, using black Stazon ink, cut around it, allowing room for a hole to be punched at one end. I inked the reverse with Picked Raspberry DI, then used a heat tool to shrink it.
I die cut a large ticket from white card, using the Sizzix Movers & Shakers Mini Tickets die, inked it with Picked Raspberry & Black Soot DI, then stamped the phrase from the Greetings & Words 1 Plate. I attached a charm clip to the top of the ticket, then added a heart charm & the shrink plastic charm, using jump rings. I glued a pink gem inside the charm clip.
I glued the ticket to my card, trapping a pink & a black feather behind. I added the number 18, using Alpha Parts, & finished my card off with a gem flower.
Thanks for looking,
Alison xxx

Sunday 18 November 2012

A bit of a pickle..... by Zuzu


Well this is a pretty simple project post (apologies). But its not a project done because i HAD to do a project; its something I actually do each year and this year I used artistic stamper stamps.


 I made my christmas mincemeat and I made some "Caramelised red onion and spiced cranberry" chutney last week ( a bit late for the chutney really but I haven't been able to do it sooner)... I over did it on the amounts again, and ended up with more chutney than i can ever use before next years batch gets made, so I am giving some away as gifts, only because, some of my friends have asked me to make them some after eating mine last year.
So if its going to be a gift, I feel it needs proper festive labels and such...


I have used the following three stamps from this page HERE: 
The bauble from Victorian christmas #4.
the snowflakes
CHRISTMAS from Christmas plate #3

I coloured the images in with "artists" pencils. (only because they dont sell "general amateur crafter's" pencils)...

See you next month. Z x

Friday 16 November 2012

Fish and Flowers by Sioux Jenneys

Hello everyone! It's my (Sioux) turn again and I'm here to share not just one card...


But two cards!!! :)
I felt so guilty that these were so easy to make that I made two cards for you today ;)


1. I have taken to loving the look of stamped images layered together...no masking at all....in shades of just a couple of colours. So I stamped the fish card in Distress Ink faded Jeans and Peeled Paint then tatter the edges and inked with Distress Ink Brushed Corderoy. I used the following stamps on this card.

Fish and "Beside the Seaside" from Beside the Seaside
The net is Mini Lattice Wire
Polka dot is Dots Background
Flower from Botanical Plate 1
Journey from Jounaling Words II

2. The flower card was stamped in Distress Ink Peeled Paint and Scattered Straw then the edges were tattered and inked with brushed corderoy again. I used the following stamps on this card.

Flower from Botanical Plate 1
Calligraphic Mat 13
Stamp from Airmail Bird Collage Elements
Small Bingo Card
Butterfly from Insects and Butterflies 1
Happy from Jounalling Words 1

Ooh! Making those made me happy :) See you again soon!
xoxo Sioux

Wednesday 14 November 2012

Vintage dressmaker with Joanna King

Hello Friends! I'm back with my Creative Spell and the second part of my November Guest Design inspiration :).

There is something really magical about the Artistic Stamper's images. They make me 'push the boundaries' and try something completely out of ordinary. At least for me, that is :). This is why, when I saw this set, I was immediately inspired to dust off my sewing machine and go wild!


For my project I used the Dressmaking No 1 plate, which is full of lovely vintage dressmaking images. Yes, they are sew nice! And what a better project to use these stamps for than a cute pin cushion, where I could safely keep all my needles and decorative pins.

I started my work by selecting two patterned fabrics and a piece of off-white cotton cloth. I'm not that good in planning ahead so you won't get any set measurements from me lol. As long as your white fabric is big enough for your selection of images and at least and inch spare on each side, you can 'patchwork' the rest of the cushion to your heart's content. If you iron all your chosen fabrics first, it will make it much easier to work with them.


Next, using a permanent ink like StazOn, stamp your images onto the printable side of an iron-on transfer paper. They are widely available, even in chain supermarket stores. Colour your images in using Distress or alcohol markers (I use Inktense pencils). When you are finished with colouring, iron the artwork onto your white cloth. Make sure to follow the manufacturer's directions for the correct results of the transfer.

The transferred artwork will be a mirror image of the original so bear that in mind if you want to use any words. I haven't tried it, but perhaps if you stamp your words with a dark ink onto white tissue paper, reverse it and adhere the words to your transfer paper before ironing, then that might be a way to go :).

I love an added sparkle and texture of embossing powders so I added some shabby pink embossing enamel on the bottom of the cushion.


Now you are ready to sew your fabrics together, fill in the cushion with padding and embellish it with a selection of ribbons, lace, charms and buttons.

Thank you so much for your lovely comments on my calendar page and I hope you will enjoy this project just as much. Have a very crafty week!

Big hugs

Tuesday 13 November 2012

Merry Christmas Tag


Hello everyone, Astrid here with my first Christmas project. At the moment I am a little bit addicted to making tags, and they are such a handy thing to have around come Christmas. 

I started by blending Weathered Wood, Broken China, Chipped Sapphire and Brushed Corduroy Distress Inks over a Size #8 Manila Tag. I then gave it a few spritzes here and there with some Perfect Pearls Forever Blue mist to give it a bit of glimmer. Next I gold embossed the Calligraphic Mat 12 all over my background.
I cut a Tim Holtz  On the Edge Distressed Doily  from white card stock, distressed it a bit with some Vintage Photo Distress Ink and then glued it to the edge of my tag as shown in the photo. I  created the main panel of the tag by stamping and embossing  one of the images of  Christmas Plate 3.  I first embossed it in a mix of black and copper embossing powder and then coloured it to match the rest of my tag. I mounted it on a slightly larger piece of Kraft card. I then stamped the sentiment from the same Christmas plate, again embossed it in black and copper and cut it out with one of my dies. While still in the die I sponged it with Vintage Photo Distress Ink. and then adhered to the tag as shown.


The last step was to colour some seam binding, using the same distress inks and adding it to the tag.
Now tags may not be everybody's thing of course, but it is easy to turn a tag into a Christmas card, and most crafters like to make at least some of their own cards, no? I'll leave you with a picture of how I turned my tag into a card, simply by matting it onto some blue and then a white folded card.


Well, I hope you liked this little Christmas project, until next time and thank you for your lovely comments, they make my day!!


Sunday 11 November 2012

Ho! Ho! Ho! ...by Emma


Hello everyone! Hope you are all well and had a wonderful weekend, so far!

It's time for me to share my latest creation with you all and as always, I hope you like it...
...and here's how I made it!

To begin with, I created the frame using Tim Holtz Sizzix dies that I have in my stash. I then stamped the image of Santa onto a piece of cream card, die cut to size to match the larger frame. I blended the card with Old Paper DI and then blended the edges with Vintage Photo before I coloured the image using Distress Markers as watercolour paints to give a soft, vintage look to the piece. I then attached the finished piece to my frame.
Next, I die cut the lamp post and holly leaves from chipboard and painted it with an Adirondack Paint Dabber, leaving the surface stippled to give a texture to the paint. I painted the holly leaves and berries and allowed them all to dry before adding a piece of acetate behind the lantern part of the lamp post, coloured with Alcohol Ink. Once all my pieces were completely dry, I attached them to the main frame.
I then die cut the Tattered Pine Cone pieces from card, blended the cones with Gathered Twigs and the leaf fronds with Iced Spruce before shaping them to make dimensional cones. I added my completed cones, twigs and punched holly leaves to my frame, together with some vintage ribbon from my stash.
Using black Archival Ink, I stamped the Merry Christmas ticket from Tim's, Odd and Ends stamp set, onto a piece of card blended with Old Paper DI and I also stamped the Calligraphy stamp using the same colours. I added the ticket to my frame and then rolled up the stamped Calligraphy piece of paper to make a scroll. I then attached this, together with a pen nib to my artwork. Finally, I added accents of Rock Candy dry glitter to the cones, leaves and lamp post.
Adirondack Paint Dabbers

So, I really hope you liked my first piece for this month!!
I'll be back later in the month with my second creation but until then...thank you for taking the time to visit and I'll look forward to reading all your comments!
See you soon...Emma x


Saturday 10 November 2012

A special canvas by Titbelsoeur

Salut les copines !
This is a very special canvas I want to share with you today, for 2 reasons : first it is fully made with recycled stuff, and second, this is going to be a long story... let's make it short ! One night, not well sleeping, I thought about the scrapbooking day that has no counterpart in mixed-media... so why not organizing a mixed-media day ? then I got in touch with 4 friends of mine to ask them if they wanted to share this odd journey with me, and they said YES ! So the 5 of us are currently leading a French forum named "Patouille et Récup" sponsored by The Artistic Stamper, each one of us presenting and tutoring her creation during 4 weeks (a single week-end was too short), and here is mine :

 an old bulb, colored with alcohol inks..

 some tea bags...


the structure is made from a rice box, the lady's dress with junk envelopes, buttons, cogs, beads, a perfume sample... and even a "hello George" coffee pad, that makes a very nice hat !


And, of course, a lot of Artistic Stamper stamps :
chicken wire : http://www.theartisticstamper.com/background_stamps.htm
words : http://www.theartisticstamper.com/words_and_sayings.htm
Post stamps : http://www.theartisticstamper.com/collage_stamps.htm


I hope you like my "canvas",
thanks for stopping by, 
I am looking forward to reading your comments ! 
See you again soon...

Friday 9 November 2012

Angelic Art Doll by Alison

Hello Stampers!
I made an art doll for my very first post as a CT member, nearly 2 years ago, & as they are great fun to make, I thought it was time I made another :)
I started by painting a piece of corrugated card with silver paint dabber, for the base.
For the face, I stamped Girl With a Flower in Her Hair onto white card, coloured her with antique linen distress ink, then cut her out. I added a festive foliage poinsettia to her hair, with a crystal brad. I used wired tinsel for her halo, & attached it behind with sticky tape.
I painted the die-cut wings with pearl paint dabber, & added some platinum stickles to the lower edges.
For the dress, I used running stitch to attach some pretty organza to some white cotton. I pulled the thread to create a gather, then sewed the angel's head on through the sticky tape on the back.
I die cut a Sizzix snowflake, using music paper, attached a Christmas muse token with a long fastener, & attached the snowflake to the dress.
I added some beaded trim to the bottom edge of the base,some eyelets & chain to the top, then glued on the wings, & attached the angel, using silicone glue.
I hope this inspires you to make your own art doll,
thanks for looking, & for all the lovely comments you leave, which are greatly appreciated,
Alison xxx

Tuesday 6 November 2012

Yo-ho ho... and a bottle of rum... By Zuzu

A pirate themed altered box from me today. I am very in-love with Mr Tim's skull stamp and have been playing with it for a few days non stop.
this little wooden chest was altered by using some old looking map papers i had in my stash and inked around the edges with Vintage Photo distress ink.
I then stamped the Skull, label, fish and starfish on to some pale cream paper that i had added some antique linen ink to.


I coloured both the fish in with watercolour pencils then cut out and glued all the stamped images  in to place on the box.
Next I used the distress rock candy crackle paint (clear) over the fish, starfish and skull and left it to do its crackle thing.  once it was dry and crackled, i used a baby wipe to rub some brown paint in to the cracks and cleaned all the excess off.


I used gold gleam polish around some of the edges of the box to add to the aged, distressed look then sealed the whole box with a coat of sealer/varnish.
then i simply glued some metal embellishments into place.


Monday 5 November 2012

On a Pedestal by Sioux Jenneys

Well it's November.....yikes it's Bonfire Night! Where has the year gone!!! LOL I'm here to share a tag today :)


1. I spritzed a tag with some Dylusions in melted chocolate, vibrant turquoise and lemon zest...then spritzed a bit of water over to help amalgamate the colours. Dried it off a bit and started to dab up some of the still wet ink for some texture. I then put a stencil/mask over and spritzed some water over it, removed the mask and blotted the water off some more.

2. I used the journaling mini words 1 as a background and stamped it in Archival coffee using a second stamping.

3. I stamped Life is a Circle in Archival black and over stamped the smaller clock face from Tick Tock plate in Archival coffee. Carpe Diem and part of another Architectural plate 1 element were stamped on the edges in Distress aged mahogany and a couple of the swirls from the Tick Tock plate were stamped in Distress vintage photo

4. I stamped the man from Mens plate 1 and the pedestal from Architectural plate 1 onto previously coloured card and cut out...attaching them with glossy accents.


5. I had used some kitchen roll to dab up the ink in step 1 so I decided to waste not want not and hand wrote the sentiment onto this using a sharpie pen (any water resistant pen will do it)...

..."She put him on a pedestal so that all could admire his beauty"...

the words were cut out and attached to the tag with Glue and Seal matte...it allows the background to show through to a certain extent ;) The word Beauty is from Nudes A4  plate. When the glue and seal was perfectly dry I added the lines with the Sharpie pen. 

6. The edges were aged with Distress aged mahogany and fibres threaded through the tag.


Hope you liked the tag today :) See you again soon....keep safe with those fireworks!
xoxo Sioux

Sunday 4 November 2012

Announcing October's Challenge Winner

Hi, it's the Chief Stamper here again. One of my favourite things to do every month is to choose the winner of last month's challenge. Now I always pick the winner by Mr. Random.org, and so I never know who is going to win....This month, this gorgeous tag


 fell into the random pot!! Congratulations Mark, please email me so you can choose your prize :)
Thank you to everyone who joined in, there was some stunningly gorgeous work!
This month's challenge is a definite must , as it is ANYTHING GOES, and the girls  used recycling as their theme.. such innovative projects, that you must take a look, and of course, please join in... You will get a chance to win £15.00 worth of stamps plus the Kling-On to go with it. I shall look forward to seeing everyone's entries :)
Have a very creative Sunday
Hugs
Jennie

Friday 2 November 2012

Steampunk in October... by Joanna King

Hello! My name is Joanna (aka Asia King) from Under a Creative Spell and I am super excited to play this month with the Artistic Stamper Creative Team!

My first guest design project was inspired by Kate Crane’s monthly calendar challenge. I must admit, I haven’t been very disciplined to keep up with all the months but after seeing this amazing range of stamps, my hands were immediately itching to start crafting!

For my calendar pages I used water colour paper, which I first painted with gesso. Then all the fun began! Using purple, orange and white acrylic paints I painted the pages, smearing and overlapping the colours as I went.

Then to start building layers I randomly sponged the paints through a mask with a collage of numbers. When the paint was dry, I stamped layers of images from Large Dotty Closed Background and Punk Plaid Background and added some paint accents through sequin waste.
Using an embossing ink I stamped the 'bubbles' from the Borders A5 #2 plate and heat embossed them with Stampendous Aged Wine embossing enamel. Then, with white, black and gold paints I stamped a number of circles with plastic bottle tops and I added a few black lines with Ranger's craft scraper.
To 'frame' my page I used the tiny dots and gears from the Borders A5 #2 plate which were stamped with Pumpkin and Jet Black StazOn inks.
My calendar days were punched from scraps of patterned paper and the edges were distressed with  Spiced Marmalade and Dusty Concord distress inks. The Steampunk butterflies and the snail are from the Tick Tock Butterflies set, which I stamped onto patterned paper and coloured in with the distress inks.

To finish the page I added some black rub ons. I hope you've enjoyed reading about this project and I look really look forward to sharing my next project with you!

TTFN!